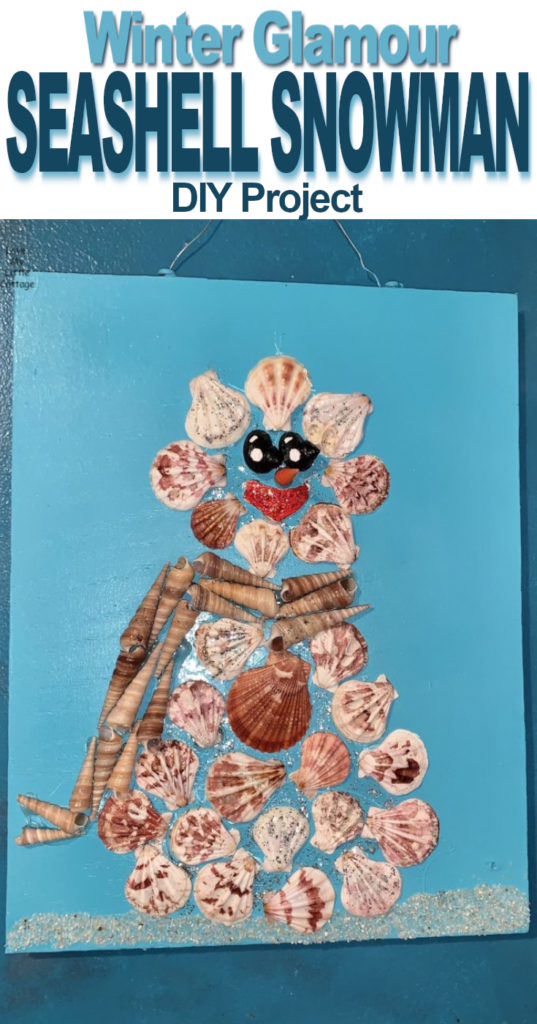
Celebrate the glamour of winter with this fun and playful Seashell Snowman. Using a nice painted backdrop, a little hot glue and some of the treasures that you collected on your last visit to the beach you can create your own seashell snowman.


*I was given free product for this post by DecoArt.
Lately I’ve been creating coastal decorations for my cottage in the South Carolina Lowcountry. I enjoy making unexpected things from seashells, sand, and Spanish moss- like sandy gingerbread men, angels, and this Winter Glam Seashell Snowman. Below is a sampling of coastal items I’ve made recently:

- Rustic Coastal Christmas Centerpiece
- Hand Painted Coastal Christmas Cutting Board
- Shell Angel Christmas Tree Topper
- Sand Fiddler Crab Coastal Christmas Tree Ornament
The Winter Glam Seashell Snowman was fun and easy to assemble. You can add buttons, pearls, rhinestones and other materials to jazz him up even more.
Materials:


- wooden board or sign
- hot glue gun and glue sticks
- sand
- seashells
- Modge Podge
- 1″ sponge brush, 1/4″ flat brush, 1/4″ angle brush
- Apple Barrel 2613E Caribbean, 20404 Black, 2605E Crimson, 20408E White, 20589E Harvest orange
- DecoArt Red Nebula Galaxy Glitter, Silver Moon Galaxy Glitter (Thanks DecoArt!)
- acrylic sealer- get one with a gloss finish
First, I painted my board with several coats of Caribbean using the 1″ sponge brush. You can use a hair dryer to hurry the drying process, if desired.

I painted the shells for the eyes using the 1″ sponge brush and Black. Be sure to rinse your brushes in between colors. I used the 1/4″ angle brush to paint the nose Harvest Orange.


Next, I glued the eyes and nose in place, then played around with the arrangement of the other shells. It’s a good idea to do this before you apply the glue to the shells for the snowman’s head, scarf, and body. Then, I squirted hot glue on the board, and added shells a few at a time.


Make sure you pick off the extra hot glue strands afterwards. Also, if your project is going to be hung outside, it’s better to use Elmer’s Glue rather than hot glue. Items attached with hot glue fall off when it’s cold outside- true story!
I added some highlights to the eyes with the 1/4″ flat brush and White. I also painted the mouth with Crimson. I used the 1/4″ flat brush to add Red Nebula Glitter to the mouth and Silver Moon Glitter to everything else.


For the final touch, I brushed Modge Podge along the bottom of my board with the 1″ sponge brush, then sprinkled sand on top.


You’re all done! I hope you enjoyed my Winter Glam Seashell Snowman project!
 Passionate about all things domestic, as a Christian wife and homeschooling mother of 5 children, I am especially interested in encouraging stay-at-home moms, one-income families, and cottage dwellers of all kinds. I love DIY proj
ects, sewing, decorating, cooking, and collecting and selling vintage dishes. Read More…
If you enjoyed this post, subscribe to Love My Little Cottage and receive every post by email.
Happy Winter!
Kristie
_______________
RECENT POSTS
 |
 |
 |
 |
 |
 |
_______________
CATEGORIES
BDIY ProjectsB BHolidaysB BUpcycleB
Disclosure: Some of the links in this post are affiliate links. If you click on the link and purchase the item, I will receive a commission. I only recommend products or services that I personally believe will add value to my readers. All opinions stated are strictly my own. Read our full disclosure policy for more information.
I love this idea. I have so many buckets of seashells in the garage I should also put them to use…
Thank you for sharing at The Really Crafty Link Party & happy new year. Pinned!
It is fun to create things with seashells!
Very cute. Thank you for sharing at Party In Your PJ’s!
Thanks for hosting, Ann!
This is definitely a great project if you have a coastal home. Love how whimsical it is. Thanks for sharing at #HomeMattersParty
Thanks, Donna! I’m so glad you decided to be the new host of Home Matters- I love y’all’s party!