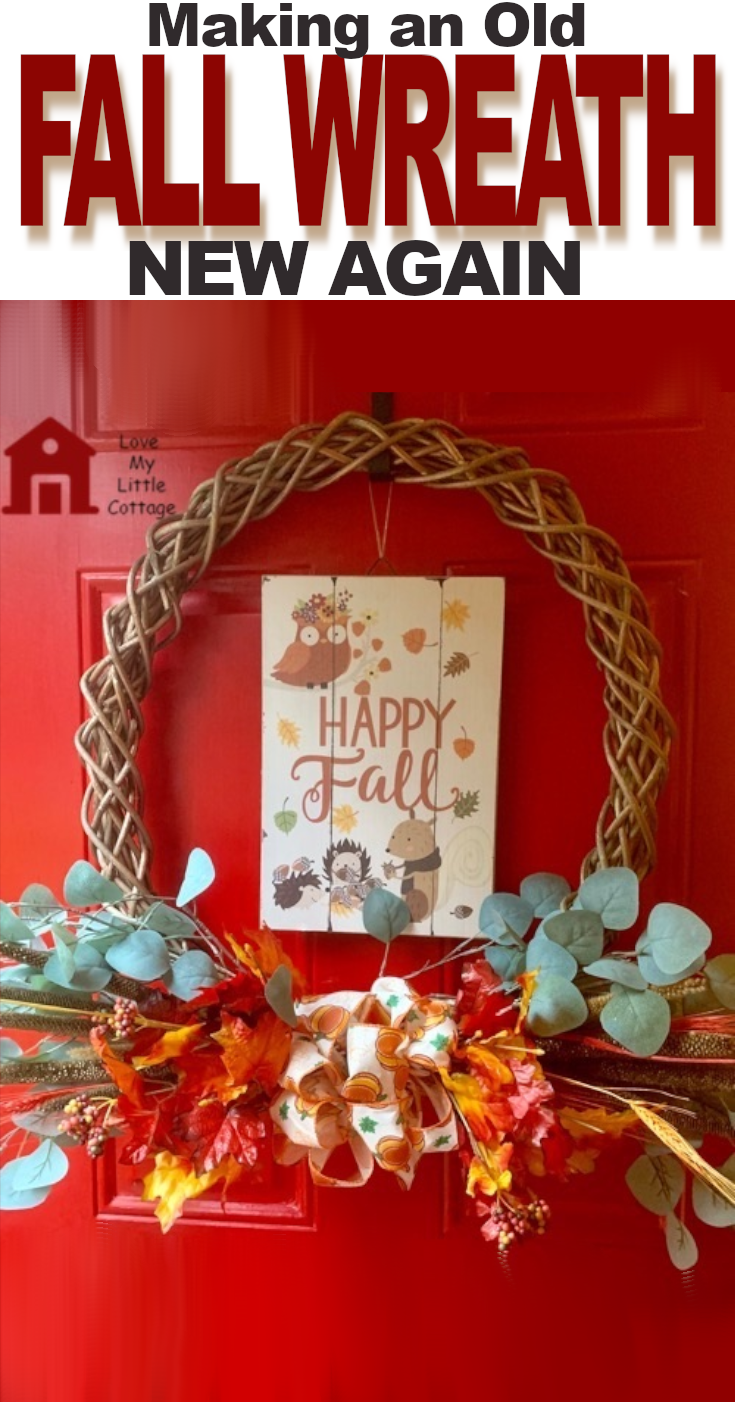
Outdoor Wreath Makeover with a new Happy Fall look! With just a little cleaning, some autumn inspired decorations and a snazzy new bow, you can turn a dusty, tired, old wreath into something new and beautiful again.

Do you have a wreath that needs refreshing for the fall? I sure did, until my old wreath was revamped with a Happy Fall Outdoor Wreath Makeover! Last spring, I found an old, dusty, wooden wreath at Goodwill that was in great need of a redo. It looked gorgeous after receiving a fresh coat of gold paint, a pretty bow, some eucalyptus leaves, and a few faux strawberry branches. However, after spending 6 months outdoors in the elements, the strawberries were worn and moldy. The tired, spring wreath is fresh and vibrant once again after receiving a “Happy Fall” woodland animal sign, some cattail look-alikes, a few silk leaves, and a snazzy pumpkin ribbon bow.
MATERIALS NEEDED


▪ large wooden wreath
▪ floral wire
▪ “Happy Fall” sign
▪ 2” wired ribbon
▪ floral picks- I used silk leaves and colored, dried wheat
▪ faux eucalyptus
▪ scissors
▪ cattails, or cattail look-alikes
▪ jute-for hanging the “Happy Fall” sign
-
MORE IDEAS YOU’LL LOVE
 FRIENDS AND FOOTBALL FALL WREATH
The perfect combination of fall colors and shapes, some football to salute the beginning of the season, along with a touch of aquamarine blue to tie in the colors of …. continue reading
HOW TO MAKEOVER AN OLD WREATH FOR FALL

My Happy Fall Wreath was quick and easy to make, especially since the wreath was already spray painted gold, and the eucalyptus leaves were still attached. I thought about removing the eucalyptus leaves, but didn’t. I liked the green foundation they provided for the fall foliage.


Step 1: I trimmed my cattail look-alikes, and inserted them into the wooden wreath on both sides. No glue or floral wire was necessary.
Step 2: I added the colored wheat on both sides.
Step 3: I placed a thick pick of fall foliage on both sides of the wreath. Make sure all items are securely inserted into the crevices of your wreath.

Step 4: Time for the fun part! There’s always at least one fun part to every project. It usually lies in the finishing details. Let’s make the bow. Using 2” wired ribbon, fold it back and forth into 6” or 7” strips, one on top of the other. I made 5 “folds.” You should have one ribbon end on the bottom, and one on the top. Cut downward triangles into both ribbon ends. This will give your bow a nice, finished look.
Step 5: Cut a 10” piece of floral wire. Pinch the ribbon firmly in the middle, then fold the wire in half, and twist it tightly around the middle of your ribbon. You should have two wire tails. You’ll need these later to attach the bow to your wreath.


Step 6: Take the top loop on the right, and fold it towards the middle, to make a center loop. Then, shape all of the other loops. Tie the finished bow onto the wreath with more floral wire.
RELATED: Blue Fall Hand Painted Flower Pot


Step 7: Take a 12” length of jute string, and make a 3” loop to hang the “Hello Fall” sign onto the wreath hanger. Trim the ends, then hang the finished wreath over your sign. Adjust if necessary.


Passionate about all things domestic, as a Christian wife and homeschooling mother of 5 children, I am especially interested in encouraging stay-at-home moms, one-income families, and cottage dwellers of all kinds. I love DIY projects, sewing, decorating, cooking, and collecting and selling vintage dishes. Read More…
If you enjoyed this post, subscribe to Love My Little Cottage and receive every post by email.
Happy Fall!
Kristie
_______________
RECENT POSTS FROM LOVE MY LITTLE COTTAGE
- Modern Fall Mantel in Blue and Amber
- It’s all About the Candy Halloween Beverage Station
- Stove Top Popcorn with Chocolate and Fall Sprinkles
- Create an Apple Forest Fall Tablescape
- Velvet Pumpkin Napkin Rings
- Easy All-American Apple Pie Recipe
_______________
RECENT POSTS ON FLUSTER BUSTER
 |
 |
 |
 |
 |
 |
_______________
CATEGORIES
BDIY ProjectsB BFallB BUpcycleB
Disclosure: Some of the links in this post are affiliate links. If you click on the link and purchase the item, I will receive a commission. I only recommend products or services that I personally believe will add value to my readers. All opinions stated are strictly my own. Read our full disclosure policy for more information.

That is a great way to re-use an old wreath. I often pull off old decorations and re-decorate until the wreath itself starts looking old.
It is nice to reuse decor items, rather than buying new!
Love your post. I am not crafty but I love visiting people who are! Teresa from NanaHood.com
Thanks, Teresa. I know exactly what you mean. I can’t act or sing but I love musicals!
This is a great idea, especially because you’re reusing something that would go to waste otherwise. Thank you for sharing at The Really Crafty Link Party. Pinned.
Thanks for hosting, Teresa!
I love giving a new life to something old. This is a great do-over!
Great post, inspiring me to freshen my fall wreath and get it hung.
Thank you for sharing on #omhgff this week, be sure to share often!
Have a lovely weekend!
The wreath looks great, and I’m glad you kept the eucalyptus leaves! Thanks so much for sharing at the Snickerdoodle Create Bake Make Link Party!
Eucalyptus leaves always look great on a wreath.
This is so pretty and resourceful! A really lovely idea for the autumnal season! #thatfridaylinky