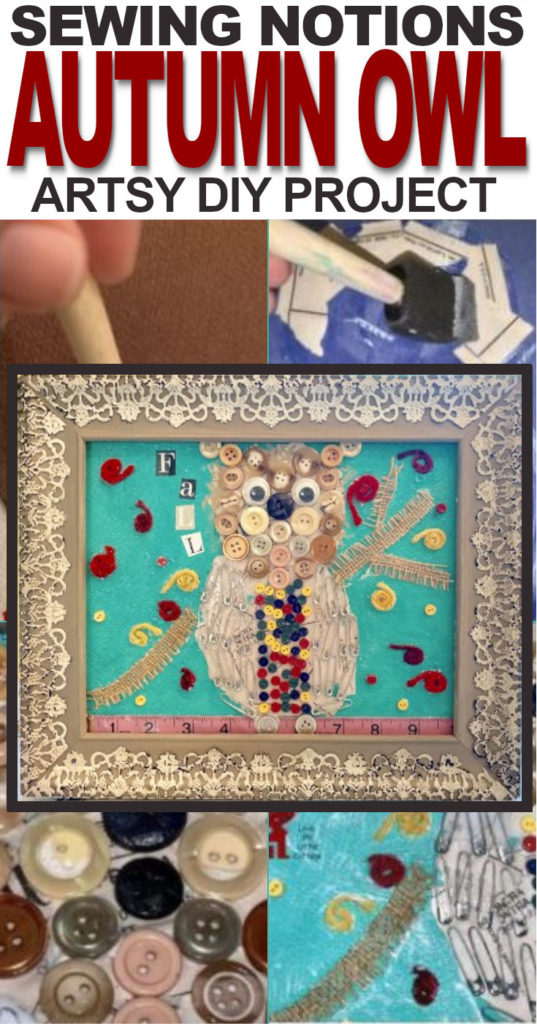
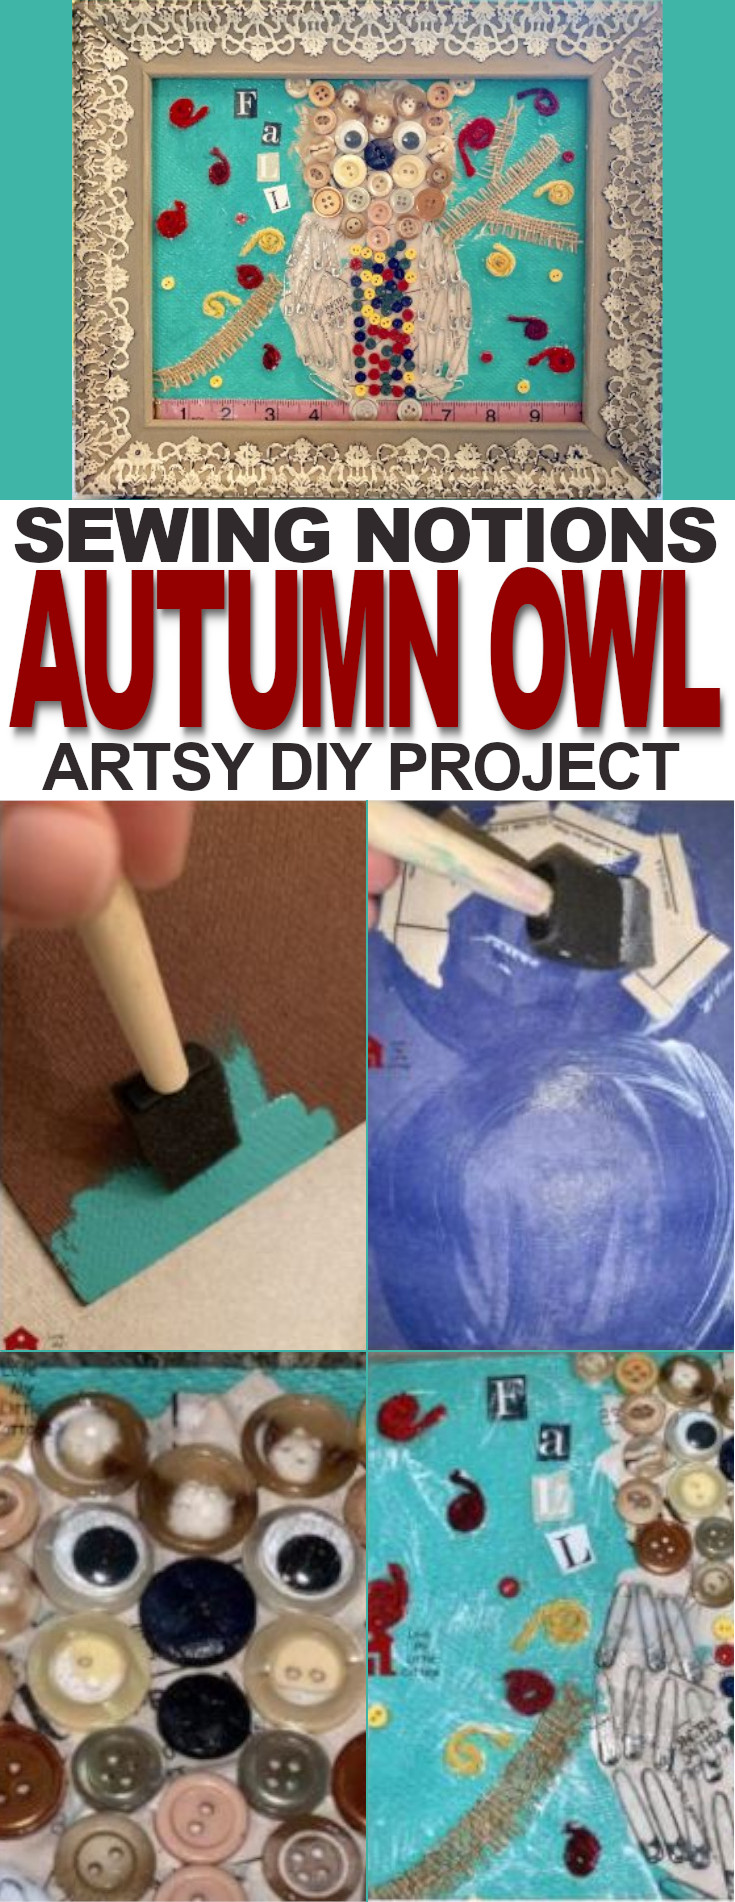
Artsy Autumn Owl a beautiful way to make use of all those old, unused sewing notions. Using an old frame, a little paint, some glue and old sewing notions is all you need to create the most beautiful piece of art.
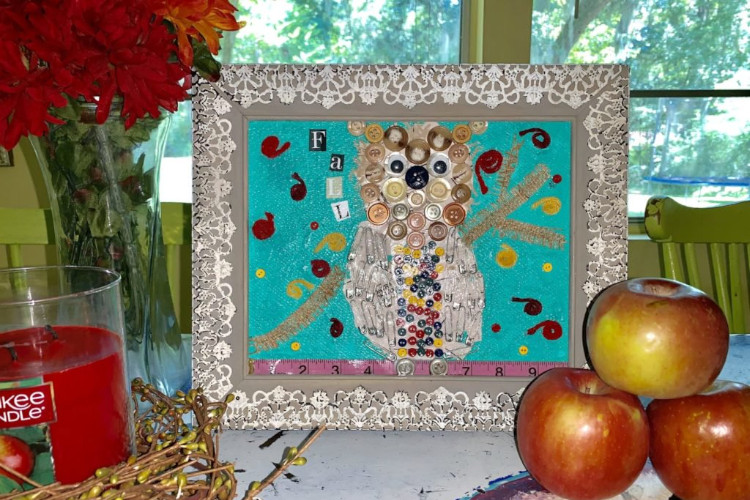 Every once in a while, the artist in me wants to make something that is purely FUN. My Sewing Notion Artsy Autumn Owl can be made by someone who is 4 years old, or 94 years old. Gather up those leftover sewing notions, and let’s get started!
In sewing and haberdashery, notions are small objects or accessories, including items that are sewn or otherwise attached to a finished article, such as buttons, snaps, and collar stays. Notions also include the small tools used in sewing, such as needles, thread, pins, marking pens, and seam rippers.
Supplies Needed:
- 8 x 10 picture frame
- Apple Barrel 2608 Country Tan
- Apple Barrel 20774E Aquamarine
- Plaid 1/2 Angle 50602 paint brush
- liner brush
- two 1” foam brushes
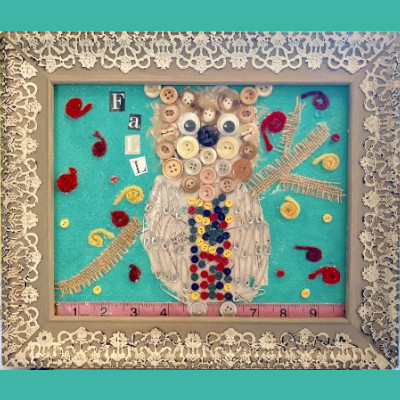
- sewing notions- I used buttons of various sizes and colors, a piece of a measuring tape, and old sewing pattern, and safety pins. Use whatever you have, and just have fun with it!
- yarn- bright red, maroon, and mustard yellow
- burlap scraps
- cutout letters from an old magazine
- school glue
- Modge Podge- I used gloss. There is also a matte; if you like a flat look with no shine.
- scissors
- wiggle eyes (not pictured)


Instructions:
First, paint the back inside part of the picture frame. Use your 1” foam brush and the Aquamarine paint. If you’re infusing blue into your fall decor this year, this paint color coordinates perfectly with those blue-green “Blue Fall” shades you’re seeing at the big craft/decor stores.


Next, tear up an old sewing pattern into small pieces. “Paint” two circles (one for the owl’s head and one for its body) using the Modge Podge and the other 1” foam brush. Cover the circles with the torn pattern pieces. Slather everything with more Modge Podge, and let it dry.


-
MORE IDEAS YOU’LL LOVE
 BUILD YOUR OWN S’MORES TOWER
A delicious way to add a summer theme to your coffee bar.Using colorful dishes adds a touch of nostalgia to it as well.
Now for the fun decorating part! You can practice on a piece of construction paper before you actually glue everything on. Also, if you glue something on and you don’t like it, just peel it off and redo it. I didn’t like the small black button under my owl’s nose, so I removed it and used a different button. First, glue the measuring tape along the bottom of the picture frame back, using the school glue.

My picture frame back was 11” long, so I knew that 5 1/2” was the center of my design. So, I slathered on the school glue and placed the buttons for the owl’s body, using the 5 1/2” mark as a guide. You can use a credit card, or other straight edge, to scoot the small buttons into a straight line. Remember, this is a fun activity, so try not to take the placement of everything too seriously.


Make the owl’s head. Be sure to include pointy ears, some eyes, and a beak. You can see where I removed the black button below his beak.


Time to add the fun elements! Cut and glue a few burlap fabric strips for the branches, and some yarn and button leaves. I made sure to glue leaves over the little grommet holes that were visible on the frame back. Dip the magazine letters into the Modge Podge, and stick them on-there is no need to use school glue for them. Brush some more Modge Podge on top of the letters. Let everything dry.


Now it’s time to touch everything up. Paint over the school glue blobs with Aquamarine and the angle brush. Paint a few hairs around the owl’s head with Country Tan, using the liner brush. Let everything dry, then gently coat the design elements with the glossy Modge Podge using the angle paintbrush (remember, do not paint over the wiggle eyes with the Modge Podge- if you do, you will have to scrape it off). You don’t want the casual observer to notice the difference between the matte finish of the paint or school glue, and the glossy finish of the Modge Podge. Once everything dried, I put the frame back into my wooden frame, without the glass.

You’re all finished! I hope you enjoyed this post!
– PIN THIS –

Passionate about all things domestic, as a Christian wife and homeschooling mother of 5 children, I am especially interested in encouraging stay-at-home moms, one-income families, and cottage dwellers of all kinds. I love DIY projects, sewing, decorating, cooking, and collecting and selling vintage dishes. Read More…
If you enjoyed this post, subscribe to Love My Little Cottage and receive every post by email.
It’s Almost Fall!
Kristie
Recent Posts from Love My Little Cottage
- Friends and Football Fall Wreath
- Cinnamon Poke Autumn Cupcakes
- DIY Hello Fall Pillow Covers
- The Ill-Fated Iroquois Gumdrop Longhouse Project
- Kit Kat Bar Pumpkin Bread with Fudge Icing
- DIY Fall Fabric Coasters
_______________
| Recent Posts | ||
|---|---|---|
 |
 |
 |
 |
 |
 |
Disclosure: Some of the links in this post are affiliate links. If you click on the link and purchase the item, I will receive a commission. I only recommend products or services that I personally believe will add value to my readers. All opinions stated are strictly my own. Read our full disclosure policy for more information.
This is really very nice so i would like to thanks for this blog good job
Thank you, Ankita!
What a fun and whimsical project!
Thanks, Michelle!
This is lovely, very creative and lovely way to use left over bits and pieces.
#ThatFridayLinky
Thanks so much, Alex!
I love this. I love projects that use up bits and scraps (since I hate parting with them). Featuring when my link party opens tonight.
Thanks Carol, I’ll drop by and see it!
So adorable!! Thanks for sharing on Homestead Blog Hop 🙂
Thanks. Liz!