A disorganized garage can hinder you from working on your projects efficiently, don’t you agree? Yes, the number one culprit for both frustration and slow progress is disorganized, messy, and displaced tools; imagine the time you could have spent working on your project instead of looking for that one screwdriver that got away under the mess.
But fear not; there is something you can do about your tool organization, and it is one of the easiest and cheapest solutions you can find. In this article, I’ll be teaching you how to create a DIY Portable Tool Caddy from scratch, a handy tool container that will allow you to organize all your tools in one place and take it anywhere in your garage.
It is a convenient, easy-to-make storage appliance that will make your life easier. Without further ado, let’s get down to it:

What You Will Need
• 4 pieces of pegboard, equally sized
• 2 square pieces of plywood, same width as your pegboard
• 2 pieces of 2×2, cut in half
• Strong adhesive glue
• Screws
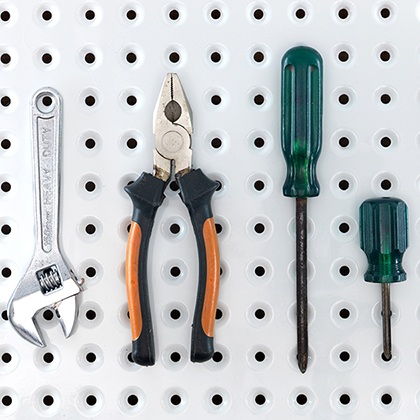
• Power drill
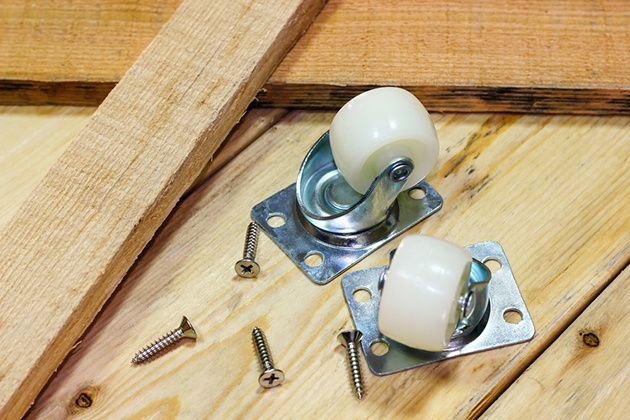
• 4 casters
• Hooks, pegboard containers, jars, baskets
• Power saw
Making your DIY tool caddy can really save you a bunch of money instead of buying commercially available ones that start at about $75. Moreover, a pegboard tool caddy will let you hang all your tools and disallow messy storage.
How to Make a Portable Tool Caddy
Start by laying one piece of flat plywood on the floor. Here, you need to begin making the base of your tool caddy. On each corner of the plywood, secure one piece of the 2×2 until your base resembles a table (the length is up to you, for me, it’s 1m or 3.2 feet).
Note: if you haven’t cut your 2×2 yet, do cut them in half with a power saw to get 4 equally sized pieces.

At the top of your base, add another piece of square plywood on the ends of the four 2×2 pieces. Make sure to secure each piece onto the plywood with screws.
Next, add your pegboard to each side of the base, creating a cube-like structure. Again, secure each board to the wooden base by drilling a screw on the top and bottom.
To make your new tool caddy portable, screw in casters to each of the corner on the top of the base. Then, turn your now portable tool caddy upside down.
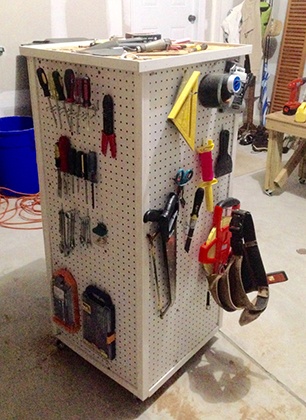
You’re not yet done! To customize your tool caddy, add hooks and containers for all your tools, bits, and pieces, just like on a regular pegboard. A good idea is to dedicate one side to the big tools, like air hoses, saws, and drills, and then have another side for all the small bits like screws, nails, screwdrivers, and drill bits. Like this one:

DIY vs Commercial Tool Caddy
Organizing your garage doesn’t have to be expensive. DIY portable tool caddies are definitely way cheaper than name-brand tool caddies that range from $75 to $200 on Amazon. As you’ve seen in our tutorial, the materials you need for this project aren’t at all expensive, and most are found already in your garage.
That’s one advantage. Another is the tool caddy’s ability to let you see all your tools in an organized way. Commercially available tool caddies offer divided boxes where you can put your tools in, but that way of organizing will require digging around to find what you’re looking for and is more likely to get cluttered over time.
And lastly, building your own tool caddy can be a lot of fun. How’s that for another great DIY achievement?
Customization Options
Another great thing about this DIY project is that you can customize your portable tool caddy the way you want. For example, you don’t have to follow the exact sizing of the materials—you can make your tool caddy smaller or bigger, just the way you want it.
Moreover, the pegboards will allow you to attach as many hooks as you want, plus baskets, jars, boxes; practically anything that will make organization a lot easier.
Conclusion
Via The Weathered Heron
Another day, another great DIY project for garage organization. Now that you can make a portable tool caddy of your own, you can start installing your garage heater, fixing your car, installing a 3-way switch, and doing more and more home improvement and DIY projects without the hassle.
Did you like this article? Please do share your thoughts in the comments below. Thanks for reading!
Author Bio:

Hi! I’m Emma Clark from The Art of Home Renovations, an interior designer with one true passion: home improvement. With my experience and skill, I want to help you make your home into a revolutionary & magical work of art through easy, inexpensive, and innovative ideas that you can DIY!
Leave a Reply