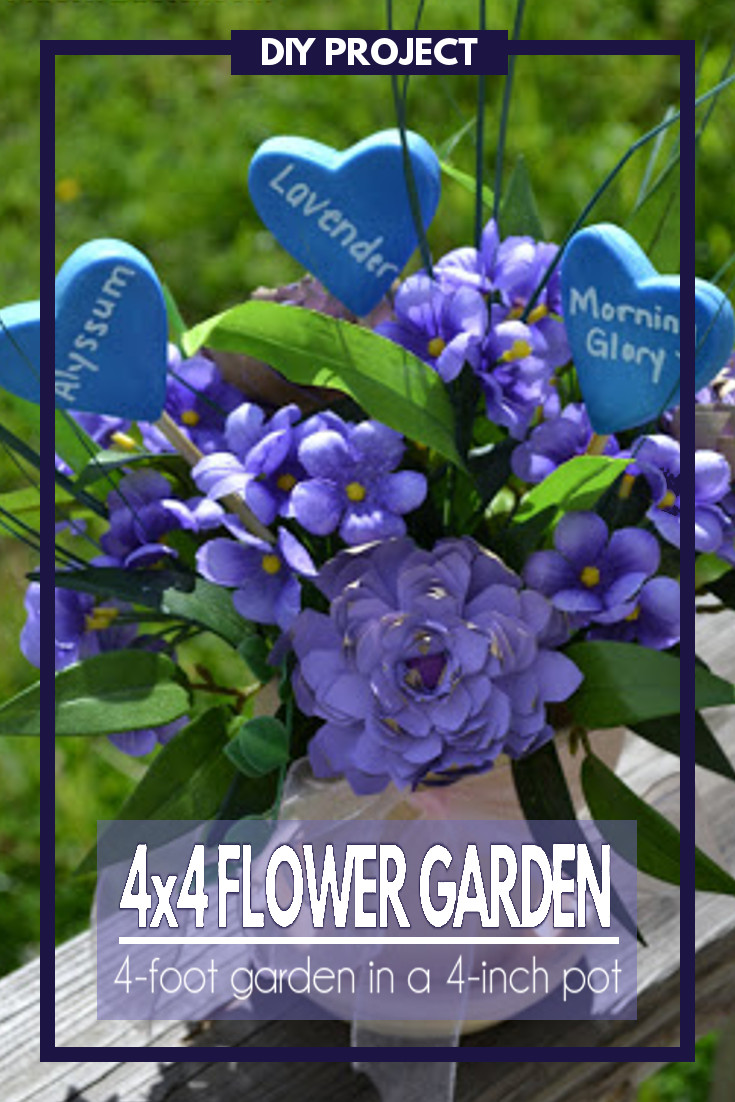
A fun DIY project that can be given as a beautiful bouquet and then used to plant the most amazing flower garden. Makes a great gift for Mother’s Day or to give to someone who loves gardening.

I had planned on doing this post before Mother’s Day but thought twice when it occurred to me that both my mother and mother-in-law subscribe to Fluster Buster. I really didn’t want them to see their gifts before I actually gave it to them. Even thought this was a loved Mother’s Day gift by everyone, I think it would be great for other occasions too.
A few weeks ago I was trolling Pintrest and came across the link Flower Garden in a Bag. Jessie from The Thriftiness Miss created these wonderful bags to use as party favors. I fell in love with the concept and wondered what I could do to put my own twist on it. Through a little trial and error I came up with making a 4 foot garden in a 4 inch pot.
Let me explain! The beautiful flower pot that you see above is actually a flower garden. In the pot, there are three paper flowers, when those flowers are rolled out they contain flower seeds. All you have to do is dig three trenches that are 1/2-inch deep and 4-feet long. You place the unrolled flower in the trench, cover with dirt and water. Before you know it you have a beautiful flower garden.
How to Make the Paper Flowers:
Step 1:
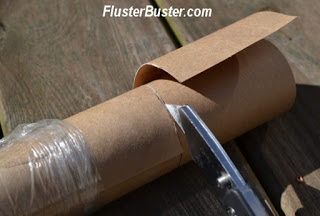
I took a roll of packing paper and measured out 3-inches. Then using a razor knife I cut the paper until the top 3 inches of the roll came off. The next step was to cut the 3-inch roll it into 4-foot sections.

Step 2:
Fold the strip of paper in half, lengthwise. Using a yardstick and a pencil make an angled line starting at the fold and continuing the full length of the strip of paper until you are a 1/4-inch from the top of the opposite end. (I hope this makes sense).
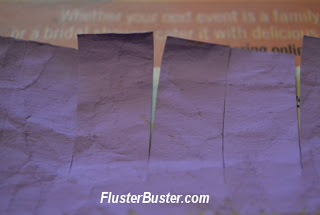
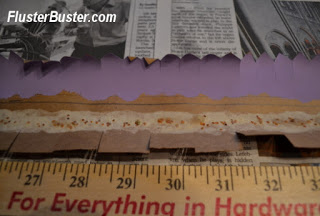
Step 3:
Using a pair of scissors, cut 1/2-inch slits down the full length of the paper stopping at the angled line each time.
Paint the 1/2-in slits using your favorite color. Don’t paint past the fold.
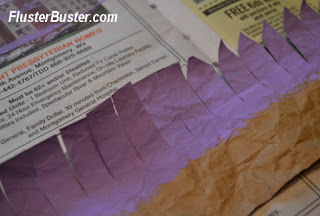
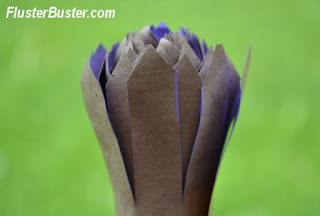
Step 4:
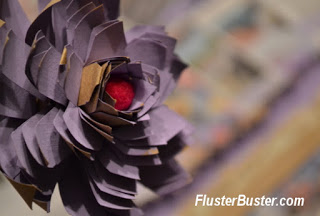
Once the paint has dried, use a pair of scissors, cut a “V” shape onto the ends of each slit (see picture on the right).
Step 5:
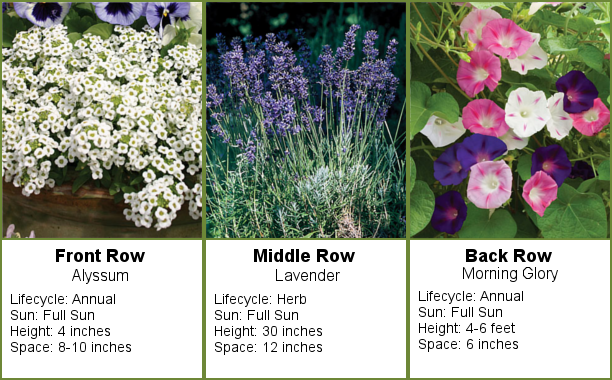
Choosing the seeds is an important step. If you are going to plant more than one type of flower then you want to make sure that: (1) they compliment each other, (2) they are varying heights, (3) they require the same amount of sunlight, and (4) the same amount of water. I chose three different types of flowers so that they could be planted in rows.
Step 6:
Using a paste, made from equal parts flour and water smear a line of paste just below the fold on the same side of the paper as the paint. Now sprinkle your seeds on the paste. Allow the paste to dry. This should take a couple of hours. NOTE: For larger seeds, put a dollop of paste on the paper to attach the seeds.
Step 7:
Starting at the end with the smallest slits roll the strip of paper up so that it resembles the picture on the right. Be sure that the paint and seeds are being rolled up into the flower.
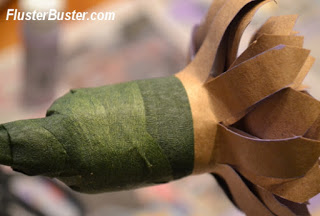
Step 8:
Attach a floral stem wire to the base of the flower using floral tape. Continue to secure the flower with the floral tape working your way down the stem wire. Then label the flower with the type of flower it is or what row to plant it in.
Step 9:
Starting at the base of the flower and working around to the center fold the petals outward.
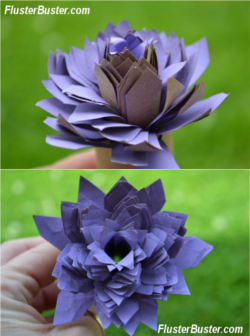
Step 10:
For a little decorative touch, glue a pom pom in the center of the flower.
I then took the paper flowers and arranged them in a 4 inch terracotta pot, that I painted, along with some silk flowers and greenery. To embellish it, I tied a pretty pink ribbon around the pot and added some Garden Stakes that I made a few weeks ago. I also attached directions on how, when and where to plant the flowers.
I’m really happy with the way that it turned out and the mother’s were thrilled with it. In fact, my mom took her’s to work and her customers were so impressed that she’s been taking orders.


![]()


Disclosure: Some of the links in this post are affiliate links. If you click on the link and purchase the item, I will receive a commission. I only recommend products or services that I personally believe will add value to my readers. All opinions stated are strictly my own. Read our full disclosure policy for more information.
Cute idea! I thought they were real too! I'd love if you'd like up to The DIY'ers
It's very pretty! I like it. 🙂
Visiting today from Tell Me Tuesday.
Great idea!
I love this idea Robin. Fabulous job. I thought they were real also. I'm so glad you joined us this week at Transformed Tuesday. Have a great week.
Hugs,
Peggy~PJH Designs
Oh that's gorgeous, Robin! Thanks for sharing.
And thanks for linking up to And Sew We Craft Linky Party!
What a fun idea! Love the flowers and how fun to have real ones blooming in the end. Thanks for sharing with SYC.
hugs,
Jann
These are so cool. The flowers would be fun to make with and without seeds. You are today's Dare to Share Feature of the Day.